例如:
auto i = 42;
 // i is an int
 cout << sizeof(i) <<endl;   //4
 // l is a long int.
 auto l = 42L;
 cout << sizeof(l) <<endl;   //8
 // ll is a long long int.
 auto ll = 42LL;
 cout << sizeof(ll) <<endl;  //8
 // l is an long long
 map<string, int> m;
 m["hello"] = 0;
 m["world"] = 1;
 for(auto it = m.begin(); it != m.end(); ++it)
  cout<< it -> first << " " <<  it ->second << endl;
 cout << "------------------------------------------------------------" << endl;
auto还可以作为返回值占位符
auto add(int t1, int t2)
{
  return t1+t2;
}
C++11也可以使用类似”foreach”的语法遍历容器。用这个新的写法,可以遍历C类型的数组、初始化列表以及任何重载了非成员的begin()和end()函数的类型。如果你只是想对集合或数组的每个元素做一些操作,而不关心下标、迭代器位置或者元素个数,那么这种for循环迭代将会非常有用。例如上面的map对象:
for(auto it : m)
  cout<< it.first << " " << it.second << endl;
字符串中有多少标点符号
string s("hello world!!");
 auto counter = 0;
 for (auto c : s)
  if(ispunct(c))    //#include <cctype>
   counter++;
  else if(isalpha(c))
   c = toupper(c);
  cout << "Punction counter is "<< counter << endl;   //2
  cout << s << endl;    //HELLO WORLD!!
参考:
《C++ Primer》
C++11中的自动类型推断和基于范围的for循环 http://blog.csdn.net/huang_xw/article/details/8760403
1. 常见数值计算函数
log(e) 默认是以e为底的自然对数。如果以10为底则修改第二个参数即可。exp是e的指数函数,其他的指数计算直接用x^n即可,例如:
> log2(4)
[1] 2
> log10(1)
[1] 0
> log10(10)
[1] 1
> log(10,10)
[1] 1
> log(exp(1))
[1] 1
>  2^3
[1] 8
2. 数列、数组
rep(): 输入重复元素
> rep(1, 8)
[1] 1 1 1 1 1 1 1 1
> rep(c(1,2,3,4),8)
 [1] 1 2 3 4 1 2 3 4 1 2 3 4 1 2 3 4 1 2 3 4 1 2 3 4 1 2 3 4 1 2 3 4
> array(1:12, dim=c(3,4))
     [,1] [,2] [,3] [,4]
[1,]    1    4    7   10
[2,]    2    5    8   11
[3,]    3    6    9   12
# 取其中一行/列
> array(1:12, dim=c(3,4))[2,]
[1]  2  5  8 11
> array(1:12, dim=c(3,4))[,2]
[1] 4 5 6
3. 数据框
数据狂是一个类似关系数据库表的数据结构,其中每列的数据类型可以不同,但是数据长度必须一致。数据框非常适合用于数据分析,它的每一列可以代表数据的每个标量或属性,每一行代表一个样本。例如:
sex <- c('F','M','F','F','M')
age <- c(23,43,51,32,60)
city <- c('bj','sh','cd','sjz', 'hrb')
people <- data.frame(city, age, sex)
people$age
people[,2]
people[people$age>30,]    #注意如果要显示所有数据,必须加逗号,[条件, ]。否则会显示undefined columns selected.
多个条件使用&,|和!来表示。
mean(people$age) 平均年龄
names(people)
nrow(people)
按排序显示:
ord1 <- order(people$age)
people[ord1,]
实用factor因子来定义标签,可以重新定义标签值
> people$NSEX<-factor(people$sex, levels=c('F','M'), labels=c(1, 2))
> unique(people$age)
[1] 23 43 51 32 60
可以用attach将数据框中的符号引入到全局空间中:
attach(people)
The following objects are masked _by_ .GlobalEnv:

    age, city, sex
4. 列表
列表(List)是非常灵活的数据结构,它的不同元素可以是不同类型(每个元素可以当作一个R中的变量),也可以是不同的长度。
> l <- list()
> l[["a"]] <- 1
> l[["b"]] <- "hello"
> l[["c"]] <- c("h", "e", "l", "l", "o")
> l
$a
[1] 1

$b
[1] "hello"

$c
[1] "h" "e" "l" "l" "o"
另外使用list的常用场景是lapply, 调用函数的每一个返回值都会作为list中的成员:
lst            <- lapply(dates, function() {...}, other_arguments)
df <- df.rbindList(lst);
5. 几个矩阵相关操作
(1). cbind()让若干向量以列的方式拼成, rbind()以行(row)
(2). 对矩阵一行/列来赋值
dmat <- matrix(nrow=8, ncol=4)
dmat[,2]<-c(1,2,3,4,5,6,7,8)
(3). 同时对多个向量执行同一个操作
sapply(veg[, 5:9], FUN=mean)
(4). 取值形成矩阵
> table(people$city, people$age)

      23 32 43 51 60
  bj   1  0  0  0  0
  cd   0  0  0  1  0
  hrb  0  0  0  0  1
  sh   0  0  1  0  0
  sjz  0  1  0  0  0
6. 向量相关
(1). sum, min, max & prod 与 cumsum, cumprod, cummin, cummax
(2). split函数可以根据某一列/某一条件来拆分
> a <- c(1,1,2,3,4,5,6,7,8,6)
> d <- c(0,0,0,0,0,0,1,2,1,2)> dd <- data.frame(a, d)
> split(dd$a, dd$d)
$`0`
[1] 1 1 2 3 4 5

$`1`
[1] 6 8

$`2`
[1] 7 6

> split(dd, dd$d)
$`0`
  a d
1 1 0
2 1 0
3 2 0
4 3 0
5 4 0
6 5 0
$`1`
  a d
7 6 1
9 8 1
$`2`
   a d
8  7 2
10 6 2
> split(dd, dd$d==0)
$`FALSE`
   a d
7  6 1
8  7 2
9  8 1
10 6 2
$`TRUE`
  a d
1 1 0
2 1 0
3 2 0
4 3 0
5 4 0
6 5 0
(3). order用于获得某一向量有序的索引,例如
> dd[order(dd$a), "a"]
 [1] 1 1 2 3 4 5 6 6 7 8
7. 其他
(1). sapply是simplify了的lapply,所谓的simplify,是指对结果的数据结构进行了simplify,方便后续处理。
sapply(scores, mean)
YuWen ShuXue
83.0 86.2
sapply(scores, quantile, probs=c(0.5,0.7,0.9))
YuWen ShuXue
50% 84.0 87.0
70% 88.6 96.6
90% 92.2 99.6
(2). tapply用于接收一系列向量并形成table,例如:
tapply(dd$a, dd$d, mean)
       0        1        2
2.666667 7.000000 6.500000
(3). apply中都有一个na.rm=TRUE选项,用于排除迭代向量中的NA值。
(4). R studio的source编辑页面可以用ctrl+n来执行
(5). 条件函数 *ifelse(条件,当条件满足时执行,当条件失败时执行) 等同于 if() {…} else {…}
参考
《R语言核心编程手册》
《R统计学入门》
我们可以在同一个server中绑定域名www.example.com和example.com两个域名:
server {
    listen 80;
    server_name example.com www.example.com;
  }
但是这样对我们的SEO非常不利,我们需要使用301(rewrite)将一个域名重定向到另一个,比如将example重定向到www.example.com。这里要依赖于正则表达式的分组(使用$1来引用分组)。
server {
    listen 80;
    server_name example.com www.example.com;
    if($host!= 'www.example.com'){
      rewrite ^/(.*)$ http://www.example.com/$1 permanent;
    }}
2. http重写到https
另一个需求是将两个域名的所有的http请求转发到https上,提高安全级别,同时实现二级域名转向一级域名。
server {
listen 80;
server_name www.debugo.com debugo.com;
rewrite ^(.*)$  https://$host$1 permanent;
}
server {
        listen 443 ssl;
        ssl_certificate /etc/nginx/server.crt;
        ssl_certificate_key /etc/nginx/server.key;
        server_name www.debugo.com debugo.com;
        root /webrooot;
        index index.html index.htm;
        if ($host != 'debugo.com') {
              rewrite ^/(.*)$ https://debugo.com/$1 permanent;
        }
        #...
}
3. 静动态分离
我们通常有自己的动态语言服务器(例如Python wsgi,Node.JS),而静态文件我们又希望使用Nginx来管理,提供缓存等功能。就要使用到下面的配置:
location ~ .*\.(html|htm|gif|jpg|jpeg|bmp|png|ico|txt|js|css)$
        {
                root /web/build;
        }

location / {
              proxy_pass http://54.3.6.34:8000;
              proxy_redirect off;
              proxy_set_header HOST $host;
              proxy_set_header X-Real-IP $remote_addr;
              proxy_set_header X-Forwarded-For $proxy_add_x_forwarded_for;
              client_max_body_size 10m;
              client_body_buffer_size 128k;
              proxy_connect_timeout 90;
              proxy_send_timeout 90;
              proxy_read_timeout 90;
              proxy_buffer_size 4k;
              proxy_buffers 4 32k;
              proxy_busy_buffers_size 64k;
              proxy_temp_file_write_size 64k;
        }
}
^^
]]>Flask是一个超级流行的Python 编写的轻量级 Web 应用框架。而Flask有一个REST插件——Flask-RESTful是为了快速构建REST API的Flask插件,它能和现有的ORM配合实现轻量级数据抽象。Flask-RESTful鼓励小型化实践,非常简单易学。本文将会使用python的Flask框架轻松实现一个RESTful的服务。
REST的六个特性:
- Client-Server:服务器端与客户端分离。
- Stateless:每次客户端请求必需包含完整的信息,换句话说,每一次请求都是独立的。
- Cacheable(可缓存):服务器端必需指定哪些请求是可以缓存的。
- Layered System(分层结构):服务器端与客户端通讯必需标准化,服务器的变更并不会影响客户端。
- Uniform Interface(统一接口):客户端与服务器端的通讯方法必需是统一的。
- Code on demand(按需执行代码):服务器端可以在上下文中执行代码
万事从Hello world起,
安装Flask-RESTful: pip install FLASK-RESTful
#-*- coding: utf-8 -*-
from flask import Flask
from flask.ext import restful

app = Flask(__name__)
api = restful.Api(app)

class HelloWorld(restful.Resource):
def get(self):
return {'hello': 'world'}

api.add_resource(HelloWorld, '/')

if __name__ == '__main__':
app.run(debug=True)
相比普通的http服务:
区别在于:
1. import了RESTful的模块,并使用了restful Api。
2. REST资源类Hello world必须继承自restful.Resource,并实现/重写父类的一些方法(比如get)
3. 将Hello world添加到Restful api资源里,并没有使用装饰器。
下面是一个更复杂的实现,实现一个item列表的更新。HTTP中有相应的请求方法可以用于描述操作资源的动作:
| HTTP方法 | 动作 | 例子 | 功能 |
|---|---|---|---|
| GET | 获取资源信息 | http://example.com/api/orders | 检索订单清单 |
| GET | 获取资源信息 | http://example.com/api/orders/123 | 检索订单123 |
| POST | 创建一个次的资源 | http://example.com/api/orders | 使用带数据的请求,创建一个新的订单 |
| PUT | 更新一个资源 | http://example.com/api/orders/123 | (使用带数据的请求,更新123订单) |
| DELETE | 删除一个资源 | http://example.com/api/orders/123 | 删除订单123 |
下面我们设计一个复杂的REST API:
#!/usr/bin/env python
# -*- coding: utf-8 -*-

from flask import Flask
from flask.ext.restful import reqparse, Api, Resource, fields, marshal_with
from pymongo import MongoClient
mongo_url = 'your-ip'
db_name = 'your-db'
col_name = 'your-col'
client = MongoClient(mongo_url)
col = client[db_name][col_name]
col.remove({})
col.insert({'_id': 1, "name": "debugo", "values": [70, 65]})
col.insert({'_id': 2, "name": "leo", "values": [65]})
app = Flask(__name__)
api = Api(app)

parser = reqparse.RequestParser()
parser.add_argument('name', type=str, required=True)
parser.add_argument('values', type=int, help='rate is a number', action='append')


class UserInfo(Resource):
    def get(self):
        return [str(i) for i in col.find({})]

    def post(self):
        args = parser.parse_args()
        user_id = col.count() + 1
        col.insert({'_id': user_id, "name": args["name"], "values": args["values"]})
        return [str(i) for i in col.find({'_id': user_id})], 201

api.add_resource(UserInfo, '/')

if __name__ == '__main__':
    app.run(debug=True)
其中我们定义了一个参数
新建一个请求解析器RequestParser,规定类型为type,否则会拒绝并提示help的信息:
param type: The type to which the request argument should be
converted. If a type raises an exception, the message in the
error will be returned in the response. Defaults to :class:unicode
in python2 and :class:strin python3.
param help: A brief description of the argument, returned in the
response when the argument is invalid with the name of the argument and
the message passed to any exception raised by a type converter.
在Chrome中使用Advanced REST Client这个应用来测试:
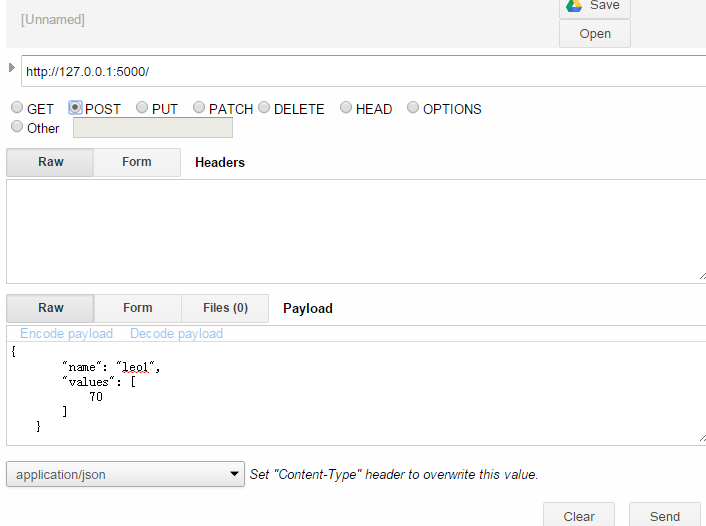
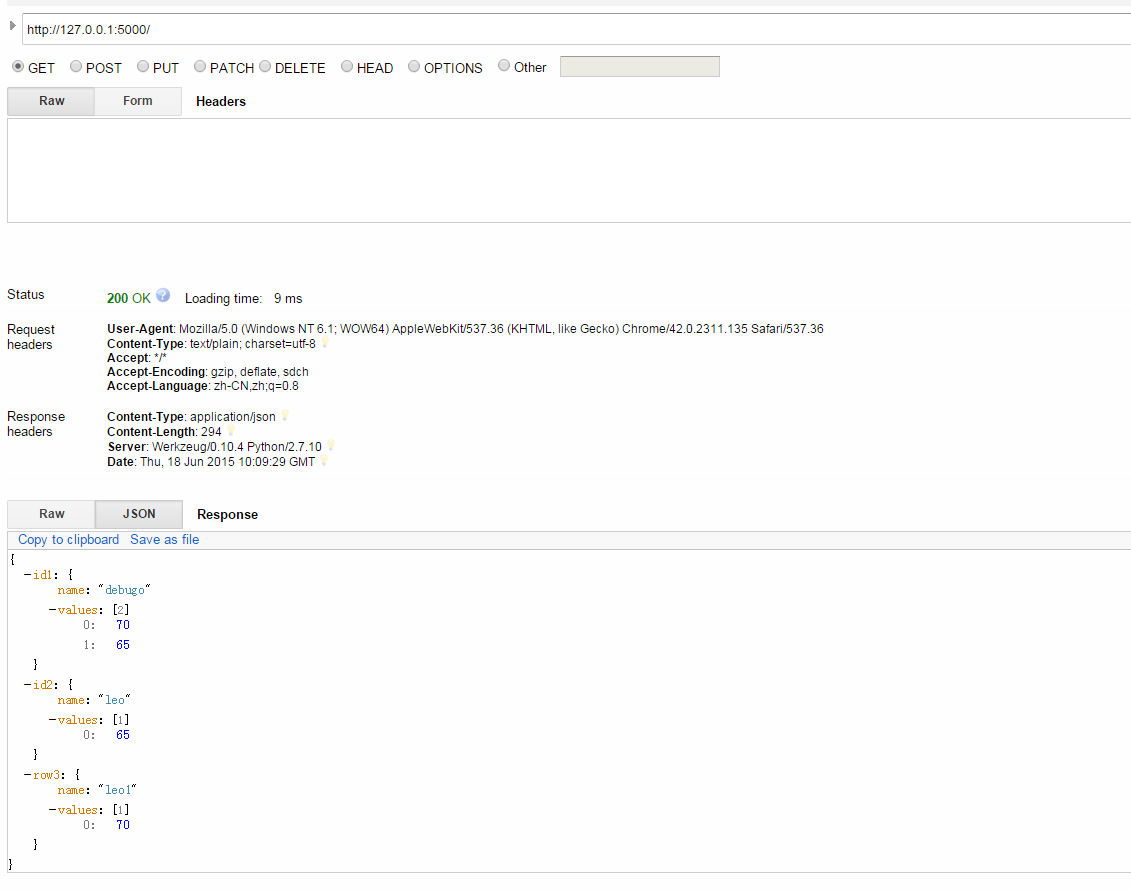
程序中成功输出下面请求结果:
127.0.0.1 – – [18/Jun/2015 18:09:23] “POST / HTTP/1.1″ 201 –
127.0.0.1 – – [18/Jun/2015 18:09:29] “GET / HTTP/1.1″ 200 –
###参考:
Flask-RESTful Document
使用python的Flask实现一个RESTful API服务器端
极客学院 Flask-RESTful 插件介绍及应用
在APScheduler中有四个组件:
触发器(trigger)包含调度逻辑,每一个作业有它自己的触发器,用于决定接下来哪一个作业会运行。除了他们自己初始配置意外,触发器完全是无状态的。
作业存储(job store)存储被调度的作业,默认的作业存储是简单地把作业保存在内存中,其他的作业存储是将作业保存在数据库中。一个作业的数据讲在保存在持久化作业存储时被序列化,并在加载时被反序列化。调度器不能分享同一个作业存储。
执行器(executor)处理作业的运行,他们通常通过在作业中提交制定的可调用对象到一个线程或者进城池来进行。当作业完成时,执行器将会通知调度器。
调度器(scheduler)是其他的组成部分。你通常在应用只有一个调度器,应用的开发者通常不会直接处理作业存储、调度器和触发器,相反,调度器提供了处理这些的合适的接口。配置作业存储和执行器可以在调度器中完成,例如添加、修改和移除作业。
你需要选择合适的调度器,这取决于你的应用环境和你使用APScheduler的目的。通常最常用的两个:
– BlockingScheduler: 当调度器是你应用中唯一要运行的东西时使用。
– BackgroundScheduler: 当你不运行任何其他框架时使用,并希望调度器在你应用的后台执行。
安装APScheduler非常简单:
pip install apscheduler选择合适的作业存储,你需要决定是否需要作业持久化。如果你总是在应用开始时重建job,你可以直接使用默认的作业存储(MemoryJobStore).但是如果你需要将你的作业持久化,以避免应用崩溃和调度器重启时,你可以根据你的应用环境来选择具体的作业存储。例如:使用Mongo或者SQLAlchemyJobStore (用于支持大多数RDBMS)
然而,调度器的选择通常是为你如果你使用上面的框架之一。然而,默认的ThreadPoolExecutor 通常用于大多数用途。如果你的工作负载中有较大的CPU密集型操作,你可以考虑用ProcessPoolExecutor来使用更多的CPU核。你也可以在同一时间使用两者,将进程池调度器作为第二执行器。
配置调度器
APScheduler提供了许多不同的方式来配置调度器,你可以使用一个配置字典或者作为参数关键字的方式传入。你也可以先创建调度器,再配置和添加作业,这样你可以在不同的环境中得到更大的灵活性。
下面是一个简单使用BlockingScheduler,并使用默认内存存储和默认执行器。(默认选项分别是MemoryJobStore和ThreadPoolExecutor,其中线程池的最大线程数为10)。配置完成后使用start()方法来启动。
from apscheduler.schedulers.blocking import BlockingScheduler
def my_job():
    print 'hello world'

sched = BlockingScheduler()
sched.add_job(my_job, 'interval', seconds=5)
sched.start()
在运行程序5秒后,将会输出第一个Hello world。
下面进行一个更复杂的配置,使用两个作业存储和两个调度器。在这个配置中,作业将使用mongo作业存储,信息写入到MongoDB中。
from pymongo import MongoClient
from apscheduler.schedulers.blocking import BlockingScheduler
from apscheduler.jobstores.mongodb import MongoDBJobStore
from apscheduler.jobstores.memory import MemoryJobStore
from apscheduler.executors.pool import ThreadPoolExecutor, ProcessPoolExecutor


def my_job():
    print 'hello world'
host = '127.0.0.1'
port = 27017
client = MongoClient(host, port)

jobstores = {
    'mongo': MongoDBJobStore(collection='job', database='test', client=client),
    'default': MemoryJobStore()
}
executors = {
    'default': ThreadPoolExecutor(10),
    'processpool': ProcessPoolExecutor(3)
}
job_defaults = {
    'coalesce': False,
    'max_instances': 3
}
scheduler = BlockingScheduler(jobstores=jobstores, executors=executors, job_defaults=job_defaults)
scheduler.add_job(my_job, 'interval', seconds=5)

try:
    scheduler.start()
except SystemExit:
    client.close()
查询MongoDB可以看到作业的运行情况如下:
{
  "_id" : "55ca54ee4bb744f8a5ab08cc4319bc24",
  "next_run_time" : 1434017278.797,
  "job_state" : new BinData(0, "gAJ9cQEoVQRhcmdzcQIpVQhleGVjdXRvcnEDVQdkZWZhdWx0cQRVDW1heF9pbnN0YW5jZXNxBUsDVQRmdW5jcQZVD19fbWFpbl9fOm15X2pvYnEHVQJpZHEIVSA1NWNhNTRlZTRiYjc0NGY4YTVhYjA4Y2M0MzE5YmMyNHEJVQ1uZXh0X3J1bl90aW1lcQpjZGF0ZXRpbWUKZGF0ZXRpbWUKcQtVCgffBgsSBzoMKUhjcHl0egpfcApxDChVDUFzaWEvU2hhbmdoYWlxDU2AcEsAVQNDU1RxDnRScQ+GUnEQVQRuYW1lcRFVBm15X2pvYnESVRJtaXNmaXJlX2dyYWNlX3RpbWVxE0sBVQd0cmlnZ2VycRRjYXBzY2hlZHVsZXIudHJpZ2dlcnMuaW50ZXJ2YWwKSW50ZXJ2YWxUcmlnZ2VyCnEVKYFxFn1xF1UPaW50ZXJ2YWxfbGVuZ3RocRhHQBQAAAAAAABzfXEZKFUIdGltZXpvbmVxGmgMKGgNTehxSwBVA0xNVHEbdFJxHFUIaW50ZXJ2YWxxHWNkYXRldGltZQp0aW1lZGVsdGEKcR5LAEsFSwCHUnEfVQpzdGFydF9kYXRlcSBoC1UKB98GCxIHIQwpSGgPhlJxIVUIZW5kX2RhdGVxIk51hmJVCGNvYWxlc2NlcSOJVQd2ZXJzaW9ucSRLAVUGa3dhcmdzcSV9cSZ1Lg==")
}
操作作业
1. 添加作业
上面是通过add_job()来添加作业,另外还有一种方式是通过scheduled_job()修饰器来修饰函数。
@sched.scheduled_job('cron', id='my_job_id', day='last sun')

def some_decorated_task():
    print("I am printed at 00:00:00 on the last Sunday of every month!")
2. 移除作业
job = scheduler.add_job(myfunc, 'interval', minutes=2)
job.remove()
Same, using an explicit job ID:

scheduler.add_job(myfunc, 'interval', minutes=2, id='my_job_id')
scheduler.remove_job('my_job_id')
3. 暂停和恢复作业
暂停作业:
– apscheduler.job.Job.pause()
– apscheduler.schedulers.base.BaseScheduler.pause_job()
恢复作业:
– apscheduler.job.Job.resume()
– apscheduler.schedulers.base.BaseScheduler.resume_job()
4. 获得job列表
获得调度作业的列表,可以使用get_jobs()来完成,它会返回所有的job实例。或者使用print_jobs()来输出所有格式化的作业列表。
5. 修改作业
def some_decorated_task():
    print("I am printed at 00:00:00 on the last Sunday of every month!")</pre>
6. 关闭调度器
默认情况下调度器会等待所有正在运行的作业完成后,关闭所有的调度器和作业存储。如果你不想等待,可以将wait选项设置为False。
scheduler.shutdown()
scheduler.shutdown(wait=False)
作业运行的控制
add_job的第二个参数是trigger,它管理着作业的调度方式。它可以为date, interval或者cron。对于不同的trigger,对应的参数也相同。
(1). cron定时调度
year (int|str) – 4-digit year
month (int|str) – month (1-12)
day (int|str) – day of the (1-31)
week (int|str) – ISO week (1-53)
day_of_week (int|str) – number or name of weekday (0-6 or mon,tue,wed,thu,fri,sat,sun)
hour (int|str) – hour (0-23)
minute (int|str) – minute (0-59)
second (int|str) – second (0-59)
start_date (datetime|str) – earliest possible date/time to trigger on (inclusive)
end_date (datetime|str) – latest possible date/time to trigger on (inclusive)
timezone (datetime.tzinfo|str) – time zone to use for the date/time calculations (defaults to scheduler timezone)
和Linux的Crontab一样,它的值格式为:
| Expression | Field | Description |
|---|---|---|
| * | any | Fire on every value |
| */a | any | Fire every a values, starting from the minimum |
| a-b | any | Fire on any value within the a-b range (a must be smaller than b) |
| a-b/c | any | Fire every c values within the a-b range |
| xth y | day | Fire on the x -th occurrence of weekday y within the month |
| last x | day | Fire on the last occurrence of weekday x within the month |
| last | day | Fire on the last day within the month |
| x,y,z | any | Fire on any matching expression; can combine any number of any of the above expressions |
几个例子如下:
# Schedules job_function to be run on the third Friday
# of June, July, August, November and December at 00:00, 01:00, 02:00 and 03:00
sched.add_job(job_function, 'cron', month='6-8,11-12', day='3rd fri', hour='0-3')
# Runs from Monday to Friday at 5:30 (am) until 2014-05-30 00:00:00
sched.add_job(job_function, 'cron', day_of_week='mon-fri', hour=5, minute=30, end_date='2014-05-30')
(2). interval 间隔调度
它的参数如下:
weeks (int) – number of weeks to wait
days (int) – number of days to wait
hours (int) – number of hours to wait
minutes (int) – number of minutes to wait
seconds (int) – number of seconds to wait
start_date (datetime|str) – starting point for the interval calculation
end_date (datetime|str) – latest possible date/time to trigger on
timezone (datetime.tzinfo|str) – time zone to use for the date/time calculations
例子:
# Schedule job_function to be called every two hours
sched.add_job(job_function, 'interval', hours=2)
(3). date 定时调度
最基本的一种调度,作业只会执行一次。它的参数如下:
run_date (datetime|str) – the date/time to run the job at
timezone (datetime.tzinfo|str) – time zone for run_date if it doesn’t have one already
例子:
# The job will be executed on November 6th, 2009
sched.add_job(my_job, 'date', run_date=date(2009, 11, 6), args=['text'])
# The job will be executed on November 6th, 2009 at 16:30:05
sched.add_job(my_job, 'date', run_date=datetime(2009, 11, 6, 16, 30, 5), args=['text'])
^^
Ref:
http://apscheduler.readthedocs.org/en/latest/modules/triggers
http://apscheduler.readthedocs.org/en/3.0/userguide.html
例如在下面一个集群中,0,1,2位于cn-north-1a,配置2最大。而3位于cn-north-1b,我们可以通过设置优先级让2更倾向于成为primary,0&1其次,而让3避免成为primary。
testrs:PRIMARY> config=rs.conf()
testrs:PRIMARY> config.members[1].priority = 80
80
testrs:PRIMARY> config.members[1].priority = 80
80
testrs:PRIMARY> config.members[1].priority = 99
99
testrs:PRIMARY> config.members[1].priority = 1
10
testrs:PRIMARY> rs.reconfig(config)
{ "ok" : 1 }
这样就实现了我们的目的~
]]>· MongoDB使用了基于角色的访问策略来管理MongoDB的安全控制。可以赋予用于一个或多个权限来让用户能访问数据库的资源并进行某项数据库的操作。如果不对用于赋予权限,用户没有任何权限。
· MongoDB默认不启用安全授权机制。在单节点环境下,你需要在启动mongod时指定–auth,或者在参数里设置
auth=true来启用这个特性。如果你是一个shard集群或者RS的环境时,你就需要为每一个节点指定keyfile,这个文件内包含相同的字符串信息(不能包含符号),用于节点成员验证。如果制定了keyfile,就默认对RS/集群启用了auth。例如以此对MongoDB中的member执行:
echo "mongomemberspassword" > /etc/mongod.key
echo "keyfile=/etc/mongod.key" >> /etc/mongod.conf
chown mongodb:root /etc/mongod.key
chmod 600 /etc/mongod.key
service mongod restart
· MongoDB提供了很多内建角色,用户通用的数据库管理。内建角色的文档在这里http://docs.mongodb.org/manual/reference/built-in-roles/。MongoDB提供了数据库管理权限和数据库用户权限两种类型,其他的权限只能作用于admin数据库上。具体如下:
(1).数据库用户角色
针对每一个数据库进行控制。
read :提供了读取所有非系统集合,以及系统集合中的system.indexes, system.js, system.namespaces
readWrite: 包含了所有read权限,以及修改所有非系统集合的和系统集合中的system.js的权限.
(2).数据库管理角色
每一个数据库包含了下面的数据库管理角色。
dbOwner:该数据库的所有者,具有该数据库的全部权限。
dbAdmin:一些数据库对象的管理操作,但是没有数据库的读写权限。(参考:http://docs.mongodb.org/manual/reference/built-in-roles/#dbAdmin)
userAdmin:为当前用户创建、修改用户和角色。拥有userAdmin权限的用户可以将该数据库的任意权限赋予任意的用户。
(3).集群管理权限
admin数据库包含了下面的角色,用户管理整个系统,而非单个数据库。这些权限包含了复制集和共享集群的管理函数。
clusterAdmin:提供了最大的集群管理功能。相当于clusterManager, clusterMonitor, and hostManager和dropDatabase的权限组合。
clusterManager:提供了集群和复制集管理和监控操作。拥有该权限的用户可以操作config和local数据库(即分片和复制功能)
clusterMonitor:仅仅监控集群和复制集。
hostManager:提供了监控和管理服务器的权限,包括shutdown节点,logrotate, repairDatabase等。
备份恢复权限:admin数据库中包含了备份恢复数据的角色。包括backup、restore等等。
(4).所有数据库角色
admin数据库提供了一个mongod实例中所有数据库的权限角色:
readAnyDatabase:具有read每一个数据库权限。但是不包括应用到集群中的数据库。
readWriteAnyDatabase:具有readWrite每一个数据库权限。但是不包括应用到集群中的数据库。
userAdminAnyDatabase:具有userAdmin每一个数据库权限,但是不包括应用到集群中的数据库。
dbAdminAnyDatabase:提供了dbAdmin每一个数据库权限,但是不包括应用到集群中的数据库。
(5). 超级管理员权限
root: dbadmin到admin数据库、useradmin到admin数据库以及UserAdminAnyDatabase。但它不具有备份恢复、直接操作system.*集合的权限,但是拥有root权限的超级用户可以自己给自己赋予这些权限。
了解权限了之后,就是赋权语句了。新版的函数比之前的要麻烦很多:
db.createUser(user, writeConcern)
user 关于用户的身份认证和访问信息(JSON);
writeConcern这个文档描述MongoDB提供写操作的成功报告。
user文档,定义了用户的以下形式:
{ user: "<name>",
  pwd: "<cleartext password>",
  customData: { <any information> },
  roles: [
    { role: "<role>", db: "<database>" } | "<role>",
    ...
  ]
}
user文档字段介绍:
user字段,用户的名字;
pwd字段,用户的密码;
cusomData字段,为任意内容,例如可以为用户全名介绍;
roles字段,指定用户的角色,可以用一个空数组给新用户设定空角色;roles字段,可以指定内置角色和用户定义的角色。
那么创建一个管理员,直接给几个所有数据库权限即可。
db.createUser({
user:"test",
pwd:"test.com",
roles:
[
  {
    role:"userAdminAnyDatabase",
    db:"admin"
  },
  {
    role:"readWriteAnyDatabase",
    db:"admin"
  },
  {
    role:"dbAdminAnyDatabase",
    db:"admin"
  }
]})
创建某个数据库的只读权限,该用户首先要使用”use db_name;”到对应的数据库下创建权限,否则它会创建在其他数据库下面(比如admin)。
db.createUser({
user:"test",
pwd:"test.com",
roles:
[
  {
    role:"read",
    db:"test"
  }
]
以此类推。我们可以通过db.auth("username","password")或者下面的方式来验证:
mongo -u test -p test.com --authenticationDatabase test
除了db.createUser(),下面几个函数也是常用的:
获得数据库的所有用户权限信息:db.getUsers()
获得某个用户的权限信息:db.getUser()
创建角色: db.createRole()
更新角色:db.updateRole()
删除角色:db.dropRole()
获得某个角色信息:db.getRole()
删除用户:db.dropUser()
删除所有用户:db.dropAllUsers()
将一个角色赋予给用户:db.grantRolesToUser()
撤销某个用户的某个角色权限:db.revokeRolesFromUser()
更改密码:db.changeUserPassword()
更多内容可以去看下reference
^^
]]>1. 安装Docker和Compose
# 当前最新的Docker是1.6.2,Compose为1.2.0
curl -s https://get.docker.io/ubuntu/ | sudo sh
sudo apt-get update
sudo apt-get install lxc-docker
# 参考http://docs.docker.com/compose/install/#install-compose
curl -L https://github.com/docker/compose/releases/download/1.2.0/docker-compose-`uname -s`-`uname -m` > /usr/local/bin/docker-compose
chmod +x /usr/local/bin/docker-compose
### 上面这个方法真的慢出翔,可以通过Python pip安装。
apt-get install python-pip python-dev
pip install -U docker-compose
这样compose就安装好了,查看一下compose的版本信息:
chmod +x /usr/local/bin/docker-compose
docker-compose -version
docker-compose 1.2.0
2. 使用Compose
使用Compose只需要简单的三个步骤:
首先,使用Dockerfile来定义你的应用环境:
FROM python:2.7
ADD ./code
WORKDIR /code
RUN pip install -r requirements.txt
其中,requirements.txt中的内容包括:
flask
redis
再用Python写一个简单的app.py
from flask importFlaskfrom redis importRedisimport os
app =Flask(__name__)
redis =Redis(host='redis', port=6379)@app.route('/')def hello():
    redis.incr('hits')return'Hello World! I have been seen %s times.'% redis.get('hits')if __name__ =="__main__":
    app.run(host="0.0.0.0", debug=True)
第二步,用一个compose.yaml来定义你的应用服务,他们可以把不同的服务生成不同的容器中组成你的应用。
web:
  build:.
  command: python app.py
  ports:
         - "5000:5000"
  volumes:
         - .:/code
  links:
         - redis
redis:
  image: redis
第三步,执行docker-compose up来启动你的应用,它会根据compose.yaml的设置来pull/run这俩个容器,然后再启动。
Creating myapp_redis_1...
Creating myapp_web_1...
Building web...
Step 0 : FROM python:2.7
2.7: Pulling from python
...
Status: Downloaded newer image for python:2.7
 ---> d833e0b23482
Step 1 : ADD . /code
 ---> 1c04b1b15808
Removing intermediate container 9dab91b4410d
Step 2 : WORKDIR /code
 ---> Running in f495a62feac9
 ---> ffea89a7b090
Attaching to myapp_redis_1, myapp_web_1
......
redis_1 | [1] 17 May 10:42:38.147 * The server is now ready to accept connections on port 6379
web_1   |  * Running on http://0.0.0.0:5000/ (Press CTRL+C to quit)
web_1   |  * Restarting with stat
3. Yaml文件参考
在上面的yaml文件中,我们可以看到compose文件的基本结构。首先是定义一个服务名,下面是yaml服务中的一些选项条目:
image:镜像的ID
build:直接从pwd的Dockerfile来build,而非通过image选项来pull
links:连接到那些容器。每个占一行,格式为SERVICE[:ALIAS],例如 – db[:database]
external_links:连接到该compose.yaml文件之外的容器中,比如是提供共享或者通用服务的容器服务。格式同links
command:替换默认的command命令
ports: 导出端口。格式可以是:
ports:-"3000"-"8000:8000"-"127.0.0.1:8001:8001"
expose:导出端口,但不映射到宿主机的端口上。它仅对links的容器开放。格式直接指定端口号即可。
volumes:加载路径作为卷,可以指定只读模式:
volumes:-/var/lib/mysql
 - cache/:/tmp/cache
 -~/configs:/etc/configs/:ro
volumes_from:加载其他容器或者服务的所有卷
environment:- RACK_ENV=development
  - SESSION_SECRET
env_file:从一个文件中导入环境变量,文件的格式为RACK_ENV=development
extends:扩展另一个服务,可以覆盖其中的一些选项。一个sample如下:
common.yml
webapp:
  build:./webapp
  environment:- DEBUG=false- SEND_EMAILS=false
development.yml
web:extends:
    file: common.yml
    service: webapp
  ports:-"8000:8000"
  links:- db
  environment:- DEBUG=true
db:
  image: postgres
net:容器的网络模式,可以为”bridge”, “none”, “container:[name or id]”, “host”中的一个。
dns:可以设置一个或多个自定义的DNS地址。
dns_search:可以设置一个或多个DNS的扫描域。
其他的working_dir, entrypoint, user, hostname, domainname, mem_limit, privileged, restart, stdin_open, tty, cpu_shares,和docker run命令是一样的,这些命令都是单行的命令。例如:
cpu_shares:73
working_dir:/code
entrypoint: /code/entrypoint.sh
user: postgresql
hostname: foo
domainname: foo.com
mem_limit:1000000000
privileged:true
restart: always
stdin_open:true
tty:true
4. docker-compose常用命令
在第二节中的docker-compose up,这两个容器都是在前台运行的。我们可以指定-d命令以daemon的方式启动容器。除此之外,docker-compose还支持下面参数:
--verbose:输出详细信息
-f 制定一个非docker-compose.yml命名的yaml文件
-p 设置一个项目名称(默认是directory名)
docker-compose的动作包括:
build:构建服务
kill -s SIGINT:给服务发送特定的信号。
logs:输出日志
port:输出绑定的端口
ps:输出运行的容器
pull:pull服务的image
rm:删除停止的容器
run: 运行某个服务,例如docker-compose run web python manage.py shell
start:运行某个服务中存在的容器。
stop:停止某个服务中存在的容器。
up:create + run + attach容器到服务。
scale:设置服务运行的容器数量。例如:docker-compose scale web=2 worker=3
参考:
Compose Document
boot2docker的Windows Installer包含了下面工具
· Boot2Docker v1.6.2
· Boot2Docker Management Tool v1.6.2
· Docker v1.6.2
· VirtualBox v4.3.28-r100309
· msysGit v1.9.5-preview20150319
我们首先在https://github.com/boot2docker/windows-installer/releases/tag/v1.6.2中下载最新的release。
安装成功后,点击桌面的Boot2Docker Start,此时它会启动docker VM,并分配一个内部网桥的地址。完成后就进入了bash命令行。下面就可以正常输入docker命令了。

Boot2docker提供了下面命令:
boot2docker init 下载镜像、初始化VMboot2docker start 启动Linux虚拟机boot2docker ssh ssh进入Linux命令行来操作dockerboot2docker stop 关闭Linux虚拟机boot2docker ip 输出虚拟机的IP地址它通过export DOCKER_HOST、DOCKER_CERT_PATH和DOCKER_TLS_VERIFY几个环境变量来让docker客户端连接到docker daemon上。
下面我们就可以正常使用docker pull来加载镜像了,比如设置并部署自己的Java应用服务。在完成编辑后可以通过下面几种方式来保存容器/镜像:
1. 导出容器
docker export > mycon.tar 在目标docker daemon上导入:
cat mycon.tar | docker import - mycon:latest 2. 保存镜像
docker save > myimg.tar 载入镜像
docker load -i myimg.tar 3. 建立自己的registry,上传到registry中。
docker tag registry_ip:5000/mycon docker pull registry_ip:5000/mycon
^^
]]>现在版本(3.2)的GitBucket提供了下面的基本功能:
公有/私有Git仓库(HTTP和SSH访问,内部已经集成了SSH服务器)
在线查看和编辑仓库代码
· 搜索(代码和Issue)
· Wiki
· Issues
· Fork / Pull request
· 邮件通知
· 活动时间线
· 用户管理(管理员)
· 用户组(和Github的组织类似)
· LDAP支持
· Gravatar支持
下面的特性讲会在以后的版本中支持:
· 网络图
· 统计
· 观看次数/打星(Watch/Star)
1. 运行gitbucket
上面提到了它可以通过两种方式运行,在release page中下载最新的war包,直接使用java -jar gitbucket.war(当然需要1.7以上的JRE环境)就可以运行,可以指定下面几个参数:
--port=[NUMBER]
--prefix=[CONTEXTPATH]
--host=[HOSTNAME]
--gitbucket.home=[DATA_DIR]
如果没有指定–gitbucket.home,它会把数据保存在$HOME/.gitbucket下面,包括用户数据库信息以及repositories。所以只把这个目录备份就可以了,是不是很方便。
2. 配置gitbucket
打开http://[hostname]:8080/(如果没有指定--port更换端口的话),就可以看到登录界面,输入root/root登录到主界面中。在右上角Account Setting中可以设置新密码、用户信息、SSH公钥等信息,那么首先为这个超级管理员配置一个新的密码吧。

在右上角的Administration里可以添加新的用户/组,设置新的系统信息。系统信息里几个重要的配置项包括:
Base URL:用于重定向、git repository地址等。这个地址需要先设置DNS后配置,是必须要设置的。
Information:站点信息。
Account registration:是否给公众开放账户注册功能。
Default option to create a new repository:默认创建repository是public还是private。其中所有用户和访客都可以读取public repository,而只有collaborator才能读取private repository。
Anonymous access: 是否允许匿名用户访问public repository。选择deny则任何信息必须验证后才能访问。对于企业内部服务,一般选择deny阻止所有匿名用户的访问。
SSH access:是否启用SSH服务,如果使用需要每个用户在自己的User profile中上传自己的public key。另外,可以配置一个SSH服务使用的端口,默认是29418。
LDAP authentication/Notifacation email:不多作介绍了。
3. 使用repository
在创建好自己的用户登录后,左侧的new repository就可以建立新的repository。这里我们用一个README.md来初始化。

完成后就可以看到和github类似的项目首页,代码都可以在线编辑,灰常方便。比如我们来编辑README.md这个markdown语句。

我们可以通过git clone http://[your-server-ip]:8080/git/[your-username]/[repository-name].git来克隆这个repository(主页右侧有这个repository的HTTP和SSH的URL提示。)。之后可以通过git push上传本地的version。项目首页上有commits, branches和releases的历史回顾,功能很全面。
右侧项目Wiki可以让我们编辑markdown格式的wiki页面,issue可以让其他人提交issues of bugs,而Setting里可以设置我们的collaborators了:

其他先不多说了,gitbucket简单好用,向gitbucket的作者致敬!
^^